Stitch Designer – BERNINA 880 and 790
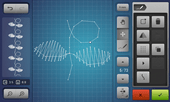
The BERNINA 880 and 790 offer hundreds of stitches. The Stitch Designer allows you to edit these stitches, or to create you very own ones. Draw your ideas directly on the screen. With a click, the BERNINA 880 and 790 convert your designs into a stitch pattern. The possibilities are endless, and your stitch library will continue to expand.
When starting out, it makes sense first of all to have a look at the already existing stitch pattern, and to alter this as desired. If you click on ‘Slow re-draw’ in the Stitch Designer, this happens fully automatically. Alternatively, you can select individual stitches using ‘scroll forwards’ or ‘scroll backwards’.

Create a new design/stitch pattern
What you should bear in mind:
-
It’s best to paint your own designs first on graph paper, then transfer them to the machine. To begin with, limit yourself to 9-mm width, then after a bit of practice you can work with 30- to 40-mm pattern width.
-
Unlike with embroidery software, when placing the stitches here you must make sure that you are creating a continuous pattern – i.e. you can’t begin just anywhere.
-
Reverse paths that are meant to meet up again at a defined point further on in the design should not be too long. Depending on the fabric, even a length of as little as 10 mm can often be too much.
-
To test the design, use the same fabric as you will later use for the real thing. Soft fabrics are not particularly well suited for sideways-motion patterns. Place embroidery stabiliser underneath all fabrics.
-
You can place individual stitches, or – especially with simpler patterns – even paint them right on the touchscreen. Individual stitches may be deleted or added at any time.
-
The ‘Undo’ key is a real boon if you ever click somewhere in error.
-
If you are not painting on the screen, place the stitches about 3 mm apart.
-
Placing zigzag stitches exactly requires a bit of practice. Allow for 2 to 3 stitches per box here. Beautiful effects can be achieved here too by making every second zigzag stitch a triple stitch.
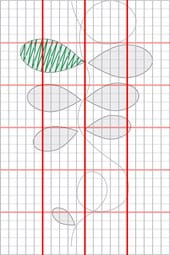
With this tendril the sinuous line is sewn with triple stitches and the grey areas are filled with zigzag stitches. The green line serves as a model for the density of the zigzag stitch.

To create the pattern, open the Stitch Designer by single-clicking on the pen. Enter stitches according to the template. Individual leaves can also be moved. To do this, highlight the first stitch of the leaf, click on the ‘Select from a defined point’ icon and highlight the last stitch of the leaf. Now the entire leaf can be moved.
The designs can also be embroidered, or uploaded to a USB Stick so that they can be used on another machine. For this, plug the stick into the machine and open ‘Personal Program’. Open the desired stitch and press on ‘Personal Program’ once more. Press ‘Paste’, select ‘Stick’ and the design appear on your stick; now click on ‘Confirm’, and you’re done!